Looking for help?
Chicken Wings
Quick Reference
| Storage | Cook Time | Cook More Time | Hold Time | Fryer Temp | Minimum Internal Cook Temp | Quality Serving Temp |
| Cooler | 7 1/2 Mins | 52 1/2 Mins | Raw – CVP Opened – 48-72 Hours Cooked – 60 Mins MPHC – Slotted Lid | 335°F | 165°F | 150°-160°F |
QA Standard
- Uncooked chicken wings should feel wet to the touch without feeling slick or slimy. They should not have a bad smell.
- Cooked chicken wings should be golden brown with crispy breading completely coating each piece. They should not appear greasy.
Tools Needed
- Two “marked” breading tubs
- Transfer pan
- Chicken basket
- Two breading tub plugs
- Wire whisk
- Yellow tongs
- Dip pot basket
- MPHC pans
- Coating basket
- Dip pot with a solid lid
- Slotted lid for MPHC
Worksafe
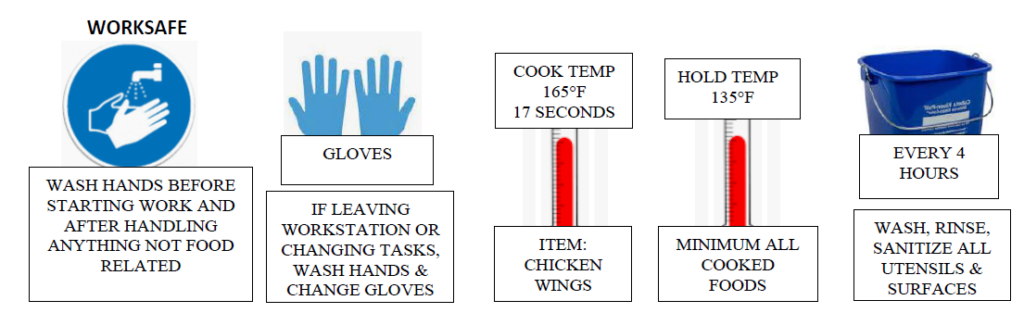
- Wear single-use gloves anytime uncooked chicken wings are being handled
- Raw chicken wings must be temperature controlled for safety (TCS). Keep raw chicken wings refrigerated to maintain a temperature of 41°F or lower.
- Dispose of gloves and thoroughly wash hands after handling uncooked meat of any kind.
- Clean and sanitize all surfaces that may have encounter raw chicken wings.
- CAUTION: You must take every step necessary to avoid cross-contamination with raw chicken wings. Do not store any other food item around the chicken wings where any liquid can splash on the food item. Never hold uncooked chicken wings above any other food item. Never store different food items on top of bags of chicken wings. Keep a good distance between any other food items and uncooked chicken wings.
Receiving and Storing
- Raw chicken wings must be time and temperature controlled for safety (TCS). Keep raw chicken wings refrigerated and iced to maintain a temperature of 34°F – 41°F until ready to cook.
- Upon receipt of the raw chicken wings, scoop ice into an ice bag. Tie the ice bag in a knot. Place the bag on top of the CVP seal. Ensure the ice spreads out over the CVP seal. When the ice melts, take the bag to the mop sink, and pour the water down the mop sink drain.
- Raw chicken wings are received twice each week. The temperature of the chicken at delivery must be between 28°F and 32°F. All cases of chicken wings will have a “pack date” marked on them. Chicken wings can be used for 12 days past the pack date.
- When calculating expiration date, the “pack date” is considered day 0
- Never accept cases of raw chicken wings that do not have at least five days remaining before it expires.
For example: If you have received a case of raw wings with a pack date of 6/30 you could not receive the case of wings after the 18th. See chart below.
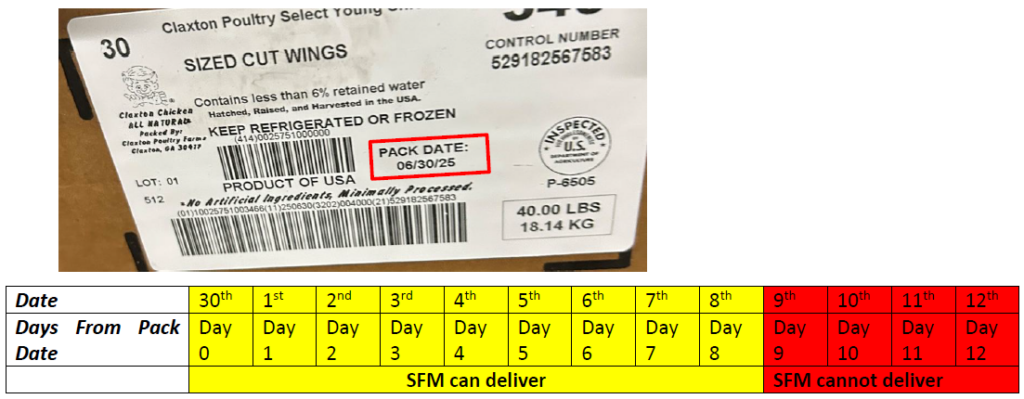
- Write the expiration date on the case.
- Calculate the expiration date by adding 12 days to the pack date.
- The “expiration date” for the example above would be 7/12/25
- In This example write Expiration Date: 7/12/25 on the case
Station Set-Up
- Fill the dip pot to the line with cold water (approximately 2 gallons)
- Add one packet (16 ounces) of batter mix and stir well using a wire whisk
- Write the 2-hour discard time on the lid
- If not used immediately, cover with solid lid and place it in the cooler
- After breading wings, remove the dip basket and cover any remaining mixture that is still within
QA and place in the walk-in cooler - When using a previously prepared dipping mixture that is within QA, stir the mix again
before use
Breading
- Ensure you are using the breading tub and breading designated for breading chicken fingers and wings.
- Check to ensure the breading is sifted and the tub is 1/2 full. Add more breading If below 1/2 full.
- Place a biscuit pan on the breading table to one side of the breading tub.
- Place the dip pot and dip basket with prepared batter mix on breading station.
- Communicate with the backline coordinator about the number of chicken wings to cook
- Place coating basket in breading. Basket should be ¾ submerged into the breading.
- Place no more than 24 wings into the dip pot.
- Move the basket up and down for about 5 seconds.
- Slowly raise the dipping basket and drain for 10 seconds.
- Empty chicken wings into the breading inside the coating basket.
- Tumble and “Fluff” the chicken wings 10 times by raising the pieces out of the breading with open fingers.
- Make sure all chicken wings are evenly coated with breading.
- Lift basket out of breading, exposing wings. Shake off excess breading.
- Place basket onto the biscuit pan to transport to the fryer. Carry the transfer pan to the chicken fryer.
Cooking
- Chicken wings cook at 335°F.
- Lower basket into shortening.
- Pick up a chicken wing in each hand. Starting in the back, hold the pieces above the shortening and let go.
- To prevent potential burns, hold the chicken fingers close enough to the shortening to prevent splashing when dropping into the shortening.
- Drop the chicken wings quickly from the back of the basket to the front of the basket. When you reach the front, start over again at the back until all wings are submerged.
- Press the button that is set for 7 ½ minutes.
- Shake the chicken by gently lifting the basket up and down twice. This will prevent chicken pieces from sticking together and allow for more consistent cooking.
- While wings are cooking, take basket back to the breading table, place it on a clean biscuit pan.
- When the timer sounds, turn the timer off and lift basket from the shortening.
- Hook basket into the bracket and let excess shortening drain for 5 seconds.
- Do not allow chicken wings to remain over shortening. They will absorb shortening and become greasy.
- Always store the chicken baskets on the fryer bracket when not in use
Holding
- Chicken wings are held in the MPHC cabinet with a slotted lid (HS2 no cover).
- Hold up to 16 wings in a MPHC pan.
- When new wings are placed in the MPHC cabinet, press the button that corresponds to the pan.
- Chicken wings may be held for up to 60 minutes in the MPHC cabinet.
- Any chicken wings remaining in a pan after the 60-minute hold time has expired must be discarded into the waste container.
Preparing Chicken Wings – Station Set-Up
- Prior to using the squeeze bottles, cut tips to the second line.
- Each squeeze bottle should have a dissolvable label with: Flavor name & 4-day discard date.
- When squeeze bottles are emptied, wash, rinse, sanitize and air dry before using again.
- Ensure the make-up table steam well is turned off prior to set up.
- Place a full-size 2-inch-deep pan into the steam well on the make-up table.
- Place each squeeze bottle into the full-size 2-inch-deep pan.
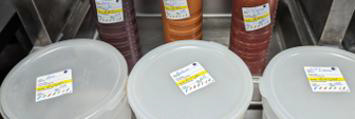
- Each sauce flavor will have its own Cambro container with lid marked with sauce flavor and 4-hour hold time.
- Cambro container & lid must be washed, rinsed & sanitized every 4 hours.
- Place the Cambro containers on the make-up table in front of the squeeze bottle that goes with it (by flavor).
Preparing Flavored Wings – Applying Sauce
- Ensure you use the correct Cambro container for the flavored sauce ordered by customer.
- Each line on the squeeze bottle represents 2 ounces of sauce.
- 8-piece order: Using yellow tongs, place 8 wings into the appropriate 2-quart Cambro container.
- Using the side measurement marks on the squeeze bottle, squeeze approximately 2 ounces of sauce onto the wings.
- Note: This is an average amount that will be needed for a regular order. The wings will vary slightly in size, and some orders may need a little more or a little less. The end result is the most important: have well-coated wings to serve the guest.
- Place the lid on Cambro. “Swirl” the wings in the Cambro in a circular motion for approximately 5 seconds.
- DO NOT shake up and down as this will cause the breading to break off the wings.
- If you notice any significant areas of the wings without sauce, use the squeeze bottle to add sauce to that wing.
Serving
- Guests may select one flavor for their entire order or choose two sauces by splitting the order in half.
- Guests may select all drums of all flats for an 8 piece only.
Serving: 8-Piece Wings or 8-Piece Wings with Fry (Dine-In)
- Place a deli liner in a 3-pound food tray. Take the lid off the Cambro, pour wings and sauce onto one end of the 3-pound food tray.
- If you notice any significant areas of the wings without sauce, use the squeeze bottle to add sauce to that wing.
- For 8-Piece Wings with Fries: Portion one regular order of fries in the 3-pound food tray next to the wings.
- Place on the serving tray
- 8-count orders of wings are served with 1 souffle cup of dipping sauce
Serving: 8-Piece Wings or 8-Piece Wings with Fry (Dine-Out)
- Place a deli liner in a plain hinged container. Take the lid off the Cambro, pour wings and sauce onto one side of the plain hinged container.
- If you notice any significant areas of the wings without sauce, use the squeeze bottle to add sauce to that wing.
- For 8-Piece Wings with Fries: Lift one side of deli liner and portion fries directly into plain hinge container.
- Place in T-shirt bag (Ensure the plain hinged container is sitting flat in the bag)
- Place a fork, knife, 2 napkins & dipping sauce on top of the plain hinged container
- 8-count orders of wings are served with 1 souffle cup of dipping
Preparing Catering Orders
| Box Size | How much total sauce? | How to prepare | Packaging for wings | Final Packaging |
|---|---|---|---|---|
| 18-piece box | 5 ounces sauce | (2) 8 pieces + 2 pieces | 9-inch box with 2 deli liners | Serve in t-shirt bag with 4 napkins, 2 forks & 2 dipping sauces |
| 24-piece box | 6 ounces sauce | (3) 8 pieces | 9-inch box with 2 deli liners | Serve in t-shirt bag with 6 napkins, 3 forks & 3 dipping sauce |
| 30-piece big box | 8 ounces sauce | (3) 8 pieces + 6 pieces | 9-inch box with 2 deli liners | Serve in big box with 5 regular fries, 10 napkins, 5 forks & 5 dipping sauces |
| 50-piece big box | 13 ounces sauce | (6) 8 pieces + 2 pieces | Family Big with 2 deli liners | Serve in t-shirt bag with 12 napkins, 6 forks & 6 dipping sauce |
Note: For individual wings, for catering sized order use approximately 0.25 oz. sauce per wing. Example: for the 18-piece box, use .5 oz. sauce (.25 oz *2) for the additional two wings.
Serving Mixed Wings (Plain/Sauced)
- If a customer placing a 18/24/30/50-piece box and requests a mix of plain and sauced wings Place ½ the wings in one end of the box and the other ½ on the opposite end of the box. Separate with deli liner.
- Example- Customer orders 18-piece box. Request 9 plain and 9 buffalo
- Place 2 deli liners in bottom of 9-inch box
- Place a 3rd deli liner in box
- Use the sauced wings to secure the 3rd liner in place, leaving ½ the liner visible.
- Flip the visible side of deli liner on top of sauced wings to create a barrier between sauced and plain wings
- Place 9 plain wings on the opposite end of 9-inch box